|
All of last week we had to rush through the lighting unit in only five days. Since I was out on Wednesday I only had four days to do everything plus a quiz and didn't get through about three assignments. Lighting itself is actually pretty simple to learn because there are only six different types of lights that we are working with at the moment. The six different types of lighting we are doing is free spotlight, target spotlight, free direct, target direct, skylight, and omni lighting. Basically my week started with me getting about eight assignments that we have to do in five days and the first assignment took me the entire day to do so I was pretty stressed out, but the next day I got two more assignments done so I was happy. The first assignment that I had to do was I had to find six different photos that went with each of the lighting types and explain how they represented that type of lighting and how they improved the scene. The next two assignments that I had to do was create a desk lamp where I created a table and then make the lamp base and the lamp shade as well. Then we put a light inside the lamp to mimic a lamp light, then we also have to add two more lights to light the rest of the scene. For the light inside of the lamp I used a free spotlight, then to light the rest of the scene I used two omni lights, one to cast a shadow and another to kind of light the back of the lamp. The next assignment was where I had to create a mini stage and put two things onto the stage then create different spotlights for each other of the items to make the shadows look cool and different. What I decided to do was make one of the shadows a soft red color and the other one a soft blue color so that there was a lot of contrast between the two. All in all, lighting hasn't been too difficult but the small time limit has made it extremely difficult to get everything in on time and I am definitely going to have to go for tutoring to get the rest of the assignments done.
0 Comments
A while ago Mr. B told us about the rest of the year and what we have coming up for the fourth quarter. We are very behind so we have to fit lighting, cameras, and rigging into a single quarter with time left at the end for EOC review as well. We are going to be doing all of lighting in a single week which sounds super tough and I'm not really looking forward to it if I am being honest.
Last year we did a little bit on lighting but didn't go super in depth. The little that I have used it though, it seems unnecessarily tough to do and seems like a big hassle for no a lot of reward. After that is cameras and I remember doing an assignment with cameras last year where we made a spaceship and a city scene then we had our camera follow our spaceship around the city while it flew around. It's a very tedious process from what I remember, but I hope there's some shortcut that I didn't know about back then. I think we have about a week or two for cameras which makes sense because it's not too huge of a topic, but rigging, on the other hand, is a different story. There's been lots of talk about rigging since the first quarter from Mr. B, Christian, and the other older kids in the class about how hard and long it is to do, so I don't really know what to expect, but I'm hoping the outcome is worth all the hassle and how long the unit is. I think we plan on doing rigging for about 6 weeks but I'm not really sure about the schedule. I hope that Mr. B goes a little easy on us in the last quarter of the year because I really don't want to be as stressed out I was this quarter with game design, it really sucked. I hope he lets us get creative with the stuff we animate and we can make it our own and actually have fun in this class. Today is the second to last day of the quarter and I just finished up the last assignment I needed to do this quarter and it feels good to finally be done with UVW mapping. It got really tough and annoying to me to be honest. The next assignment I had to do after the box assignment from last month was an assignment that had me follow a tutorial to put a UVW map to create a gas can. After that I had to make my own soda can and wrap it, but I decided that would take too much time and just skipped it. The next assignment I actually did was an assignment where I followed about 15 tutorials to put UVW maps into Photoshop and put different materials onto them to make the look like a barrel, a window, a wall, and the ground. Altogether it looks really good, but it took a really really long time. It taught me a lot about how UVW maps work and really changes how I look at game design and making assets for video games. It's a lot harder than I give it credit for and takes a lot of attention to detail. 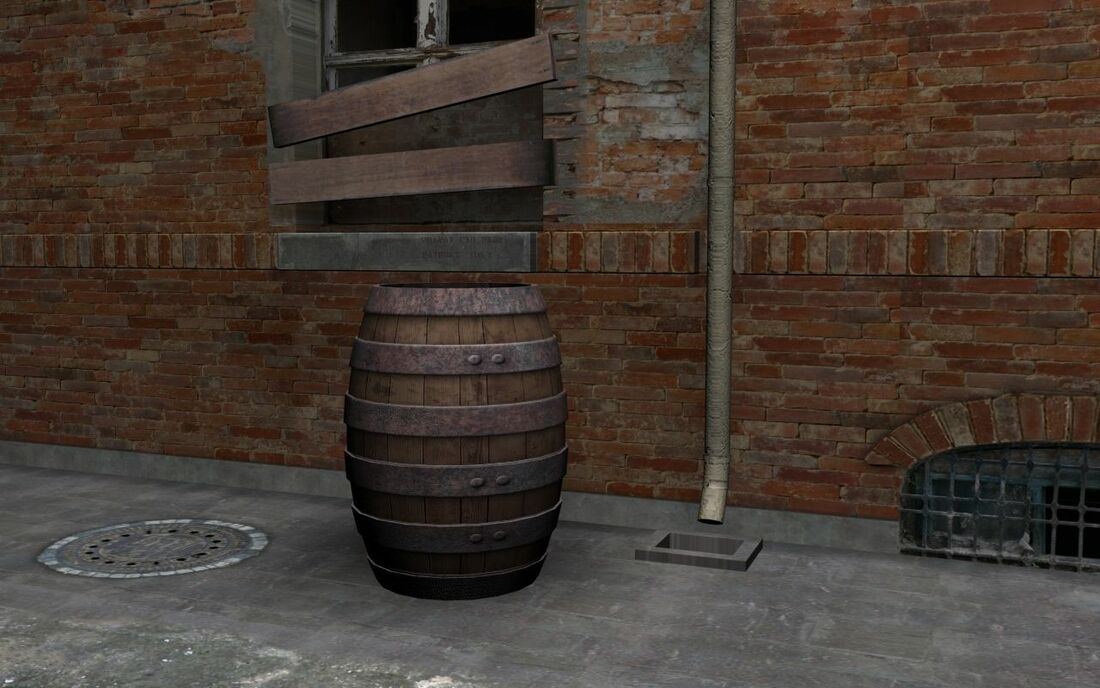 After the barrel project, the next assignment was to take our robot that we made a long long time ago, and to unwrap it and put different materials on it to make it look cool. My idea was to make a texture and put it on the the entire leg and copy that to put on the other leg, then put a lot more effort into the actual head of the robot. The robot I made, I think, looks pretty cool and was pretty fun to make as well. It was kinda of tough to get the back of the head because there was a long strip of the head that wasn't on the UVW map and it was pretty aggravating but I just decided to peel it in the UVW editor and put a red strip down it. The next part of the project was to take a picture around the school and Photoshop your robot into it and make it do a cool pose or something. 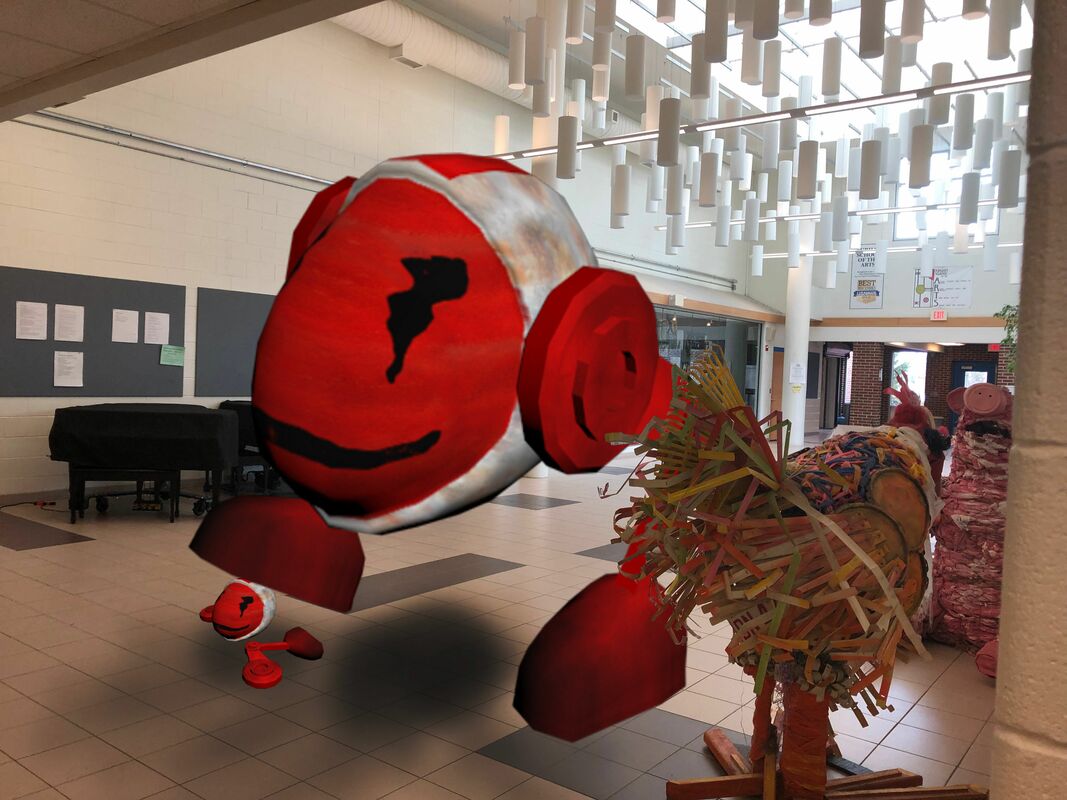 I know it looks goofy, but I really like it and I think it looks pretty cool. Getting the chicken in front of the leg was a real hassle but I think I got it to look pretty cool and I think UVW mapping is pretty cool in general but a real hassle.
Recently we began learning about UVW mapping which is where you can apply a bitmap onto an object, but you can unwrap the texture as well and edit it however you please and wrap it back onto the object. The first assignment we got with this was where we had to start out by following a tutorial in texturing a box that was something like you would find in a video game. Basically we made six different materials (one for each side of the box) and put those six materials onto a multi-sub object material and put that onto the box. You put the bitmaps for each side onto the corresponding side of the box and it starts to look like a box. Some of the faces might not be facing the right way so you have to go to the material editor and change some of the values for the U, V, or W. In the end it looked like this: 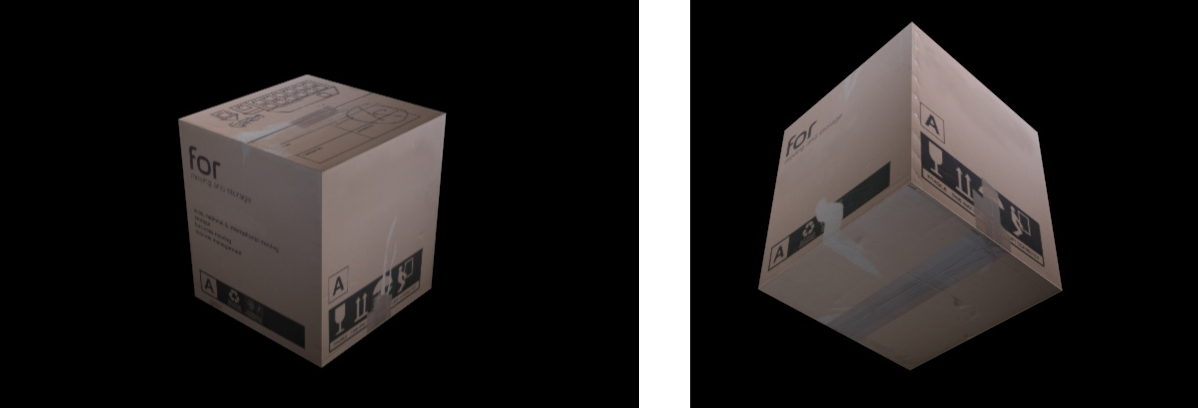 This part of the assignment wasn't very hard because it was just following a tutorial, but the next part was the tricky one. We had to find a box from Mr. B and take pictures of it on each of the six sides. You would then put each of the pictures into Photoshop and crop them so that only the box was showing. After that, all I had to do was do what the tutorial taught me to do and put it onto the box and make it look like the real thing. After all was said and done it looked like this: 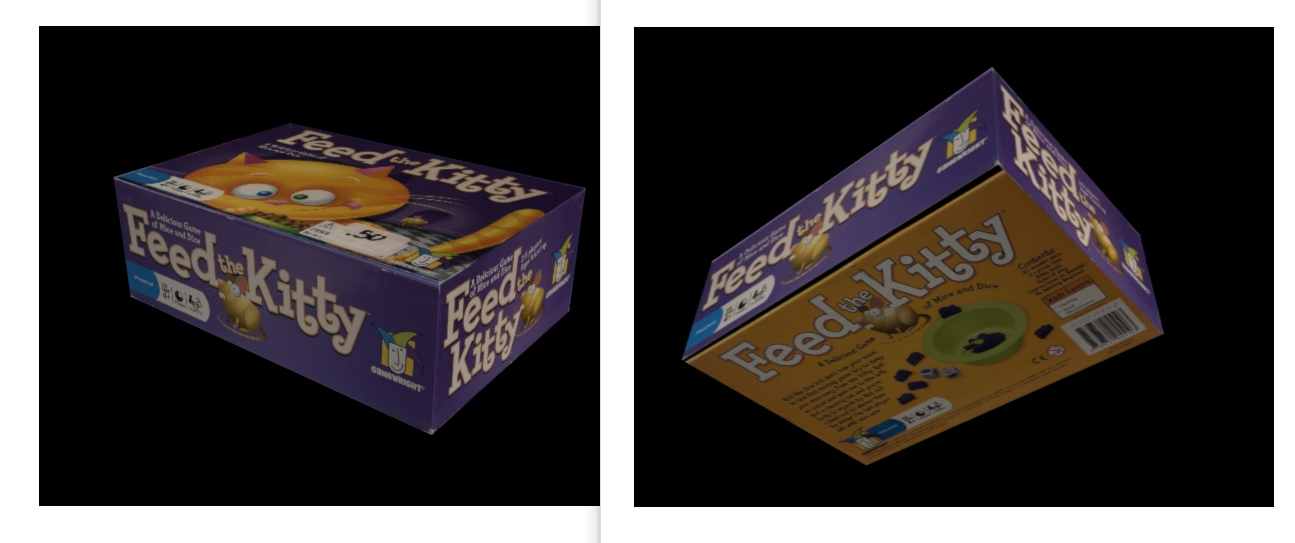 Where do I even begin with this masterpiece. This game is sooooooo huge. The game has been out for not even two months and I easily have over 200 hours sunk into it. I beat the story mode on my third day of playing and then 100% it a couple days afterward and then beat it again on "New Game +" just to see what would happen (sadly nothing happened) and it was a blast. I beat classic mode with all 74 characters (which was a pain in the butt) and that felt like a major accomplishment, and now I'm hosting a tournament with some friends in a couple of days.
This game is the fifth installment of the Smash Brothers series and includes every single character from the first game through the fourth, plus some newcomers. This game is very inviting to newcomers in the series since some of the characters are very easy to play and very very good (like K. Rool). There are also characters that take incredible skill to play at a high level and if a new player tries to play them, then they probably won't do too well (Inkling). Smash Ultimate was in the top ten selling games of 2018 when it came out in DECEMBER of that year, It sold five million copies across all regions and is selling more and more as the hype isn't even over. The game is planning on releasing six more characters in the future, two being Piranha Plant from Mario and Joker from Persona 5 , with four more being revealed later in the future. Smash Ultimate, it seems like, isn't gonna become irrelevant anytime soon and, I think, will become one of the greatest games of all time. As a kid who played Smash Melee and Brawl, this easily has been more fun for me than those two games were for sure. This game is easily a 9/10 and almost a 10/10 if the online services were better and I hope Nintendo takes some time to revamp their online services, because they SUCK. So far in the class we have been working on our project where we have to use our old neighborhood scene, put in our fountain scene and our flag into it, then add two of our robots into it and do some stuff with them. One of the robots is going to have to knock down a wall and another will have to shoot another robot and blow it up. So my first idea was to have two robots fighting and have one of the robots knock another into the wall and then that robot will blow up the other with a missile so I got to work on it. Initially setting up the scene was very easy and all I had to do then was animate the robots and I thought it was going to be easy, but it turns out animating with key-frames and moving body parts is very very tedious.
Key-frames tend to cause problems a lot so it's just annoying to have to deal with everything over and over again. I was halfway done with an animation on one of the robots and then I grouped two things on the robot together and it screwed up the entire animation and I had to restart it. Things like that just pile up and it gets annoying, but I am finally almost finished and it feels very nice. The animation doesn't look too terrible and it looks pretty cool to have the robots fighting and just destroying the environment around them. I think I did a pretty good job making it look kind of realistic with gravity affecting things in the scene, but it's definitely not perfect. The simulations that I used in the animation were bomb, massfx, cloth, and a couple others. Combining everything together just makes the animation look realistic and super cool because you really just did that you know. I hope in the future we get to do more things like this (but I also hope it's easier). Ever since I was a little kid I have wanted to go to London, so when I heard we had a chance to make the London Bridge, a car, or a nested dodecahedron, it was a no-brainer to make the London Bridge. It only took me about a day or two and it wasn't that hard since I was just following a tutorial, but it was still fun none the less. I started with one of the towers and created some cylinders to put on the outside. The top of the first tower is just made of two boxes and one of them is just made to look like its sharp on the top. Then you put cones on the tips of the cylinders. I put a cross on top of the cones. After that you go to the bottom of the tower and make another very big cylinder and drag it out to make it fit the entire bottom. After that I created half a cylinder and extrude it out to make the holes in the towers that the cars go through. Then you boolean it and subtract it to make the actual hole. After that you duplicate the tower and move it 850 centimeters to the side. The rest is the more simple part you just created three planes as the bridge, one for the road and two for the walls. The last part is creating the supports on the sides. I used a spline for all of the lines and made the parameters thicker and rounder to make it look like wire. I then duplicated it for all four sides. and attached everything together. Overall I think this assignment was pretty fun and it helped me get a lot better with parametric modeling and I hope we do more things like this in the future. 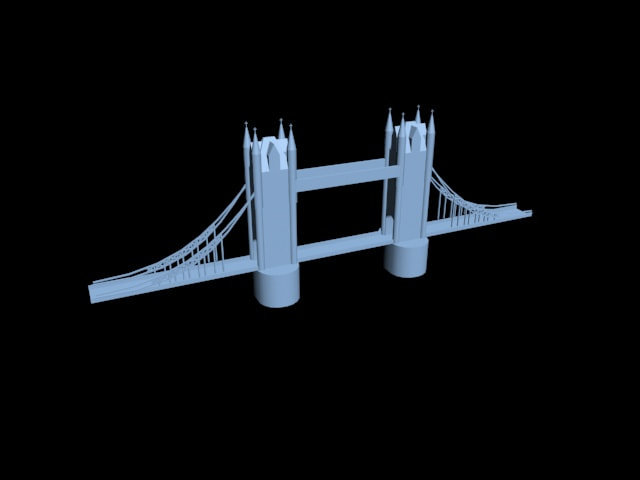 This week in Game Design II, we have been creating three different types of houses and different other things to create our own neighborhood. We had to create our own lamp posts, fire hydrant, mailbox, trashcan, a sidewalk, a road, and a grass material. This whole process for me took about a week and the hard part was just putting everything together and making the neighborhood look good. Making the houses were pretty fun because we had our own creativity in the designs of our houses and my first house was following a tutorial, my second had giant windows on three of the four sides, and my third one was more of a normal one with some better looking things. Making the lamp post and things were easy to do while using splines and cylinders. The lamp post I made by just using two cylinders, one with a bend modifier, and half an oval as the actual light. I made the trash can with a spline and a lathe modifier. The mailbox I made by using a cylinder and extruding a spline for the actual box. The fire hydrant I made by making the base with a spline and lathe, then the parts on the sides are two cylinders duplicated for both sides.  The first quarter of the year is soon to be over and it's a good time to reflect on everything I've been doing in game design over the past nine weeks. In the beginning we mostly just reviewed on the production cycle with pre-production, production, and post-production. After that we shifted into 3DS Max and started working and learning many new techniques. We learned new tools like boolean, proboolean, lofting, blobmesh, array, scatter, and lathe. Using all those new techniques we made different objects and designs. For lathing, we made an entire romantic dinner using only lathes. We made a cactus to practice scatter, and a rubix cube to practice array. Right now we are working on our first quarter project that is due next week, and what we have to do for it is we have to create a chess board, and all the chess pieces. For most of the chess pieces it is very simple to make. I used lathe to make the pawn, rook, bishop, queen, and most of the king with the exception of the cross on top. The knight though is the real challenge of this project. First thing you have to do is put a reference image of a knight piece into 3DS Max and trace over half of it with a spline. Then you drag the inner vertices out and mirror it and connect the two sides. Make a base for it to sit on and put a material modifier on it and you're done right? Wrong. You have to add details like the mouth, nose, ears, hair, and any other small details you can think of and it is much much harder to do than you might think. I've been working on the chess piece for about four days so far and I think it's actually coming along pretty well and I'm glad to see how it's turning out and I hope I get a good grade to close out the quarter.
Call of Duty Black Ops 4 is the newest Call of Duty game, as it released on October 12 of 2018. The game has three main game modes, which are: Multiplayer, Zombies, and the newest game mode, Blackout. Multiplayer and Zombies are nothing new, but Blackout is a new battle royale game mode. When you get into the game, you will be in a helicopter with all the other players in the game and you will fly over the map on a random path. Whenever you jump you can glide to where ever on the map you want to. The aim of the game is to be the last one standing and kill everyone else in the game. Enough with explaining, the actual game play of this mode is super super fun. Part of what makes it so fun is the speed of which the games go. Lots of battle royale games take a long time to get through, even if you don't even make it that far, but most games will take like 10 or 15 minutes, which makes the game much less annoying and less of a time commitment. One of the complaints many people have had is the damage of assault rifles (which should be one of the more powerful classes of guns in the game), because it takes about 6 or 7 shots to kill someone, when sub-machine guns only seem to take about 5 shots to kill someone. Most people have a very positive feeling about Blackout so far and they are planning to add a lot more things to it. The other two game modes I have played a lot more than Blackout and my favorite by far is Zombies. Multiplayer is the same old thing from every single Call of Duty, except whenever you get into a game you get to choose between 12 different classes with different special abilities which adds a bit of variety to every game, but it still gets dull. My favorite game mode in Call of Duty since I was a little tiny 10 year old, was zombies, and in this game the zombies mode is super super fun, and the changes they made are alriiiiiiight. They changed the perk system, the health system, and added classes to choose from, which has its ups and downs. They got rid of most of the old perks like jugger-nog, speed cola, and double tap, but added a ton of other perks to choose from. You get to choose the four perks that are on the map, and you can make different classes for different perk loud outs. Instead of increasing your health with jugger-nog, you have a finite amount of health for the whole game which was 150 before it was buffed, and now it is 200, so you can survive about four hits. Overall Black Ops 4 has been super fun over the past two weeks, and I've had a ton of fun playing it with friends and I'm looking forward to the DLC that should be coming out soon. Ima give this one a 8/10.
|
